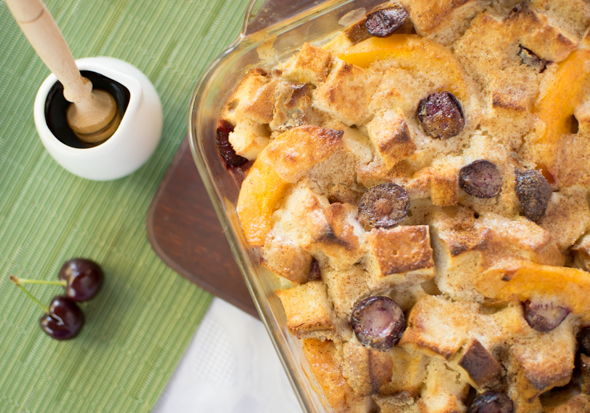
Peach and Cherry Breakfast Bake (gluten free, vegetarian, dairy free)
Posted by | Categories: Baking, Breakfast/Brunch, Featured, Recipes, Vegetarian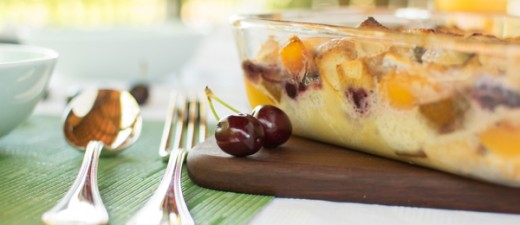
Eating seasonal fruit and vegetables is easy to do living in Western Australia because the diversity of our state means we can grow a wide variety of our own produce. This year’s cherry crop was a bumper one and I have been so grateful that I could buy fresh locally grown cherries throughout the Christmas period. As both the Boy and I are predominately vegetarians at home, our house has various fruit bowls dotted around the place such that anyone visiting might think we were obsessed with food. 😉
Cherries do contain a moderate amount of fructose so for those who suffer from fructose malabsorbtion you need to be careful with your intake. For those very sensitive, you are probably best to avoid until you have your symptoms under control. After being on a strict fructose friendly diet for a few months, I was recommended to reintroduce small amounts of fructose to assess my own personal level of tolerance. I find I can handle eating a small amount of cherries as my reaction is relatively mild provided that I do not go nuts and devour a whole bowl to myself.
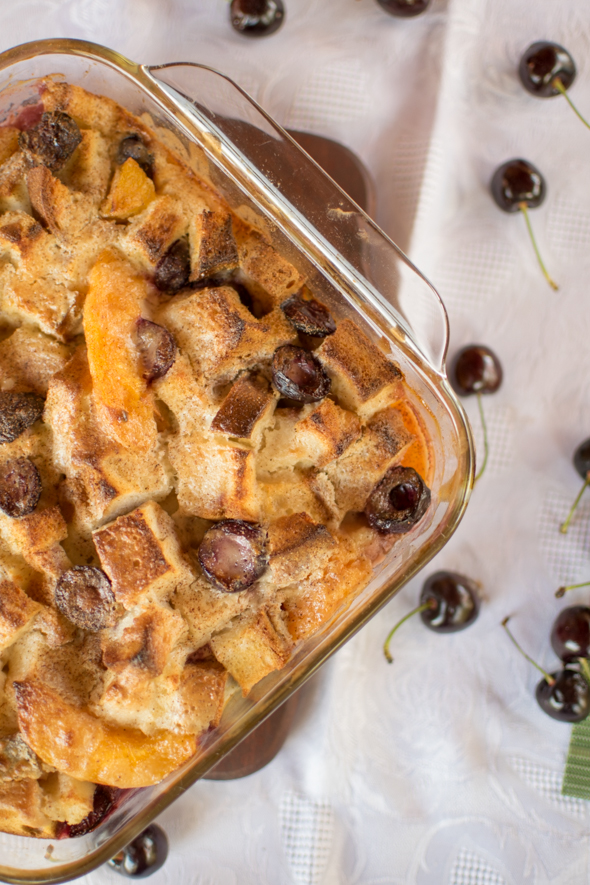
This addictive peach and cherry breakfast bake is made with fresh cherries and canned peaches but these fruits can easily be substituted with other more fructose friendly fruits if you prefer such as berries and fresh banana. It is the perfect dish for entertaining family groups over the festive season as you can prepare it prior to guests arriving and pop it in the oven once their all turn up. I think this is much better than standing in front of a hot stove frying eggs while everyone else sips champagne!

- 8 slices gluten-free bread, cut into 2cm cubes
- 3 whole eggs
- 300ml of your preferred type of milk (almond, rice, soy or dairy)
- 1 teaspoon pure vanilla extract
- 1 x 425gm can gluten-free peaches in light juice/syrup** See note
- 12-15 fresh cherries, pitted
- 100ml of prepared coconut whipping cream (see note below)
- 1 teaspoon ground cinnamon
- 70ml 100% pure maple syrup, warmed
- 1 x 275ml can coconut milk (full fat, not fat reduced, refrigerate overnight)
- 1 tablespoon maple syrup
- ½ teaspoon vanilla essence
- To make the coconut whipping cream, refrigerate a can of coconut milk overnight to allow it to harden. The following day, spoon out the milk into a bowl and add maple syrup and vanilla. Whisk or mix with an electric beater until it has the consistency of whipping cream.
- Preheat the oven to 190°C and grease a 22cmx22cm glass baking dish.
- Drain the can of peaches and discard the syrup.
- Remove the pits from the fresh cherries and cut them in halves.
- Slice about 8 slices of the bread into 2cm squares and place half the bread into the baking dish.
- Nestle half of peach slices and cherries in between the slices of bread.
- Top with the remaining cubes of bread and nestle the remainder of the peaches and cherries in this second layer.
- In medium bowl, whisk the egg yolks, milk and vanilla and pour over the bread cubes.
- Pour dollops of the whipped coconut milk prepared earlier over the bread cubes.
- Sprinkle with cinnamon and bake for about 35 minutes or until browned and crunchy on top. Once baked, set aside to cool about 5 minutes.
- Serve immediately with warm maple syrup and dollops of whipped coconut cream.
 This is an original recipe by Chompchomp for the Twelve Days of Blogger’s Christmas at Belmont Forum. All ingredients to develop this recipe were funded for by Belmont Forum. Props are Chompchomp’s own.
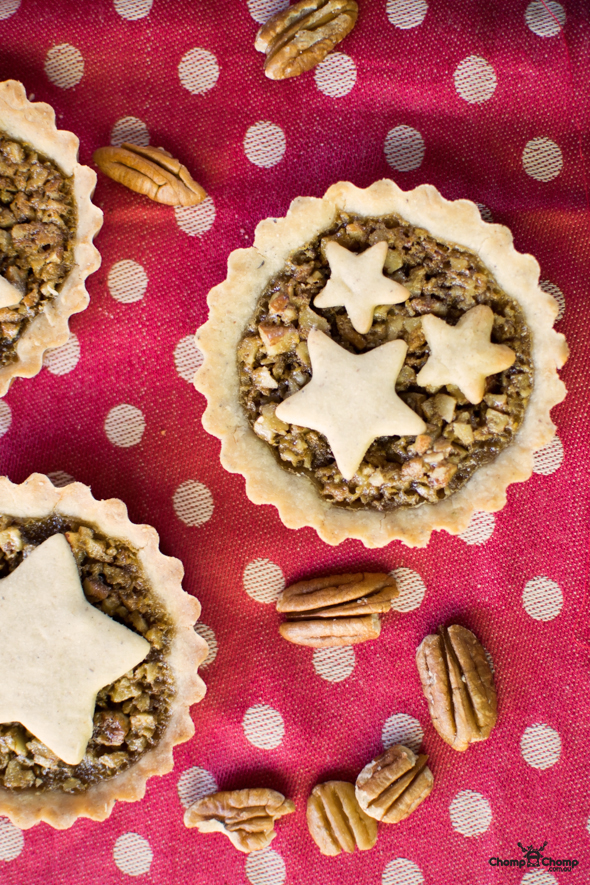
Mini Pecan Pies (gluten free, fructose friendly, FODMAP friendly)
Posted by | Categories: Baking, Desserts, Featured, Recipes, Vegetarian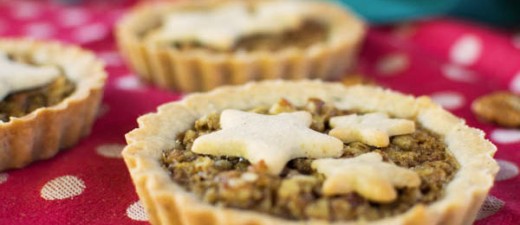
There are some childhood food favourites of mine that die hard. My Mum is a talented baker and when we were kids she could effortlessly create a whole repertoire of delectable treats that never lasted long out of the oven. For school bake sales, her chocolate slice would always be the first to sell out and her melting moments were a textural delight. At Christmas time there were a number of cherished creations that would be guaranteed to fill our fridge and her pecan pie was one of those.

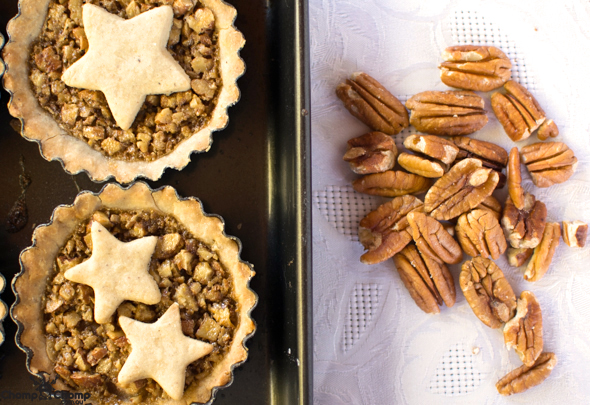
When I was approached by Belmont Forum to develop some recipes for Christmas I knew just had to have at least one symbolisation of my childhood and decided to adapt Mum’s recipe to be more gluten free friendly. There is nothing sugar free, vegan or paleo about these pecan pies but then I feel we all have to live a little at Christmas time. Even if it means hitting the gym a little harder in the New Year! 😉
- Readymade gluten free sweet shortcrust pastry
- 20 grams butter, unsalted, room temperature
- ¼ cup brown sugar, firmly packed
- ½ teaspoon vanilla essence
- 1 egg, room temperature
- ¼ cup pure maple syrup
- ½ cup pecans, roughly chopped
- Defrost ready-made gluten free shortcrust pastry as per packet instructions.
- Preheat oven to 170C. Grease individual tartlet trays and one baking tray.
- Roll pastry 2mm thick between two sheets of baking paper.
- Place pastry into tartlet tins and trim edges to neaten. Using a star shaped pastry cutter cut the stars which will be used to top each of the pies.
- Weigh down the inside of the pies with baking weights or uncooked rice.
- Place pies and stars on the baking tray and bake in a pre-heated oven for 10 minutes or until golden brown. The stars will take slightly less time to cook, approx. 7-8 minutes.
- Leave oven on 170C.
- Ensure the butter is at room temperature. Beat the butter, sugar and vanilla in a mixing bowl on low speed with electric beaters for about 1 minute until mixture is light and creamy. Add egg and maple syrup, beat well. Add the chopped pecans.
- Pour the filling mixture into the prepared pastry pie shells.
- Bake for 5-10 minutes or until the filling is set.
- Place the pastry stars on the pies while they are warm and let them stand for 10 minutes before removing them from their tins.
- Transfer to a wire rack to cool.


This is an original recipe by Chompchomp for part of the Twelve Days of Blogger’s Christmas at Belmont Forum. All ingredients to develop this recipe were funded for by Belmont Forum.
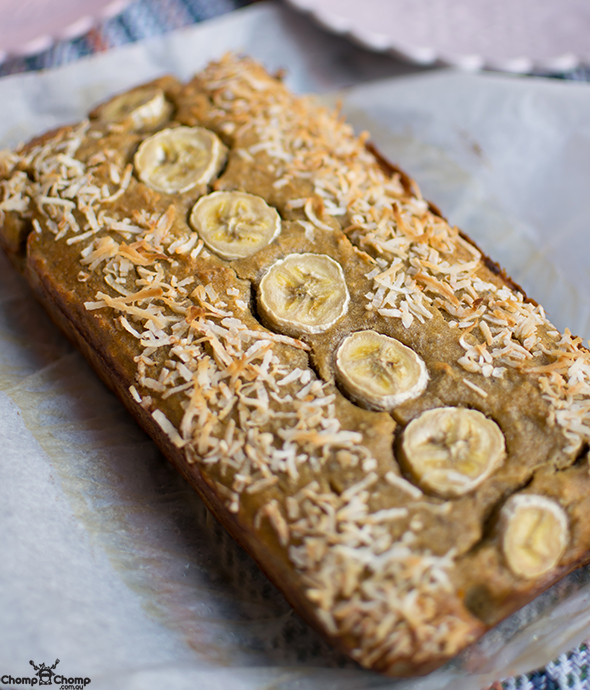
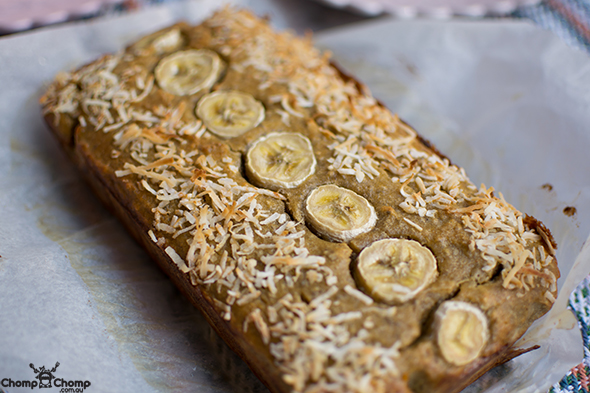
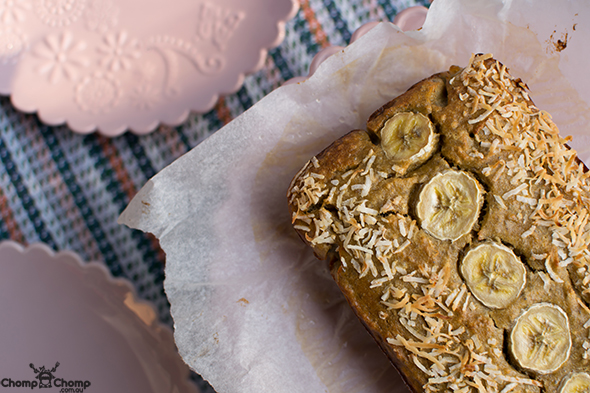
Paleo Coconut flour Banana bread (gluten free, dairy free, fructose friendly, grain free)
Posted by | Categories: Baking, Blender Recipes, Featured, Paleo, Recipes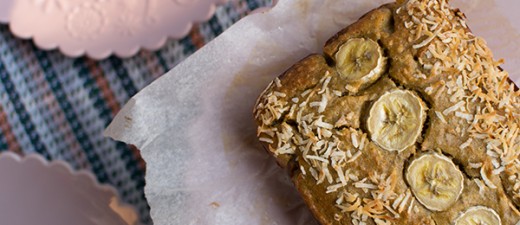
One of my most popular recipes on the blog is my coconut flour banana bread. It is one of our staples at home and whenever we have browning bananas in the fruit bowl I will get a request from the Boy to bake it. Since I first published the recipe in early 2013, I have progressively made some tweaks to improve it whilst not taking away from its purpose of being somewhat healthy.
I found that by adding in chia seeds to my original recipe along with beefing it up with a few more eggs, the end result is banana bread with much improved texture without any of its predecessors crumbliness. This banana bread toasts beautifully and with the increased fibre content of the coconut flour it can be quite filling.
I was recently approach by Belmont Forum to provide recipes for publication on recipe cards to be displayed in their centre and I knew this paleo banana bread would be a total hit. Better still, it is very allergy friendly as it is grain free, gluten free, dairy free and fructose friendly.
- Makes 1 loaf
- 400 g ripe bananas
- 6 free range organic eggs
- 2 teaspoons vanilla extract or 1 teaspoon vanilla bean paste
- ¼ cup (50 grams) coconut oil
- ½ teaspoon ground cinnamon
- 2 teaspoons gluten free baking powder
- ¼ cup (65 grams) pure maple syrup
- ½ cup (55 grams) coconut flour
- ¼ cup (35 grams) chia seed
- Extra banana and shredded coconut to decorate
- Preheat your oven to 150 Celsius (fan forced) or 170 C (no fan).
- Combine banana, oil, cinnamon, vanilla, eggs, maple syrup and baking powder into a blender or food processor and blend until creamy and combined. For those with a Thermomix blend for 2-3 mins | Speed 5. or until smooth and creamy. Alternatively you can do this by hand in a large bowl.
- Add the coconut flour and chia seeds and mix through. (Thermomix 2 min | Speed 2)
- Rest for 10-15 minutes to allow the chia and coconut flour to expand.
- Lightly oil one loaf tin and then line with baking paper.
- Spoon batter into the tin, at this stage you can decorate the bread with flaked coconut and sliced banana before baking.
- Bake for 55 – 60 minutes depending on your oven (a skewer inserted into the centre should come out dry). Cover the top with foil if over-browning.
- Remove from the oven and allow to cool before turning out the loaf.

Vegan fructose friendly tortillas inspired by Rebecca Kerr
Posted by | Categories: Baking, Blender Recipes, Featured, Raw Food, Recipes, Vegetarian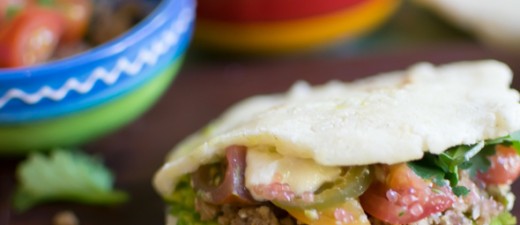
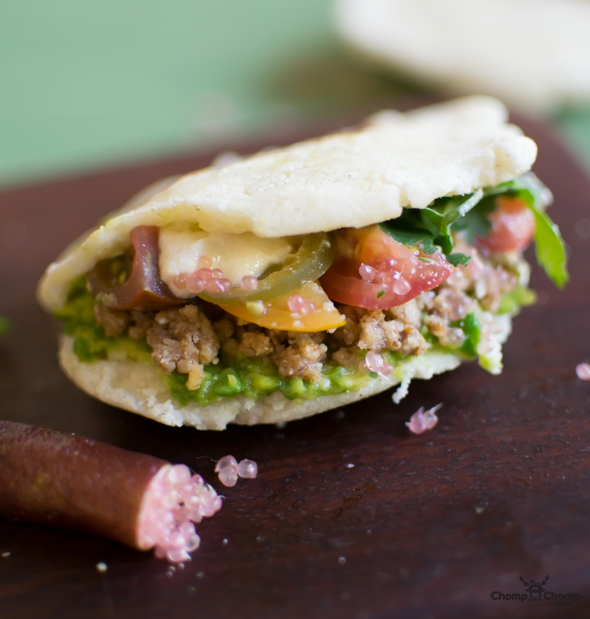
I recently attended a cooking demonstration by gluten free chef Rebecca Kerr as part of the Eat Drink Perth Festival. Like many others on a strict gluten free diet, she has longed for an easy, reliable bread recipe that produces something that tastes good. Gluten free bread is a temperamental food to bake and can often end up tasting too heavy and doughy or worse it ends up like a crumbly savoury cake. Commercially made gluten free bread often has a long list of ingredients many of which include sugars, artificial additives and preservatives. Rebecca discovered for herself a type of flour used in South American and Mexican cooking called masa lista. This is a particular type of flour made from corn by a process called nixtamalization were the corn is pre-cooked in an alkaline solution before being ground. This process releases the glue-like substance from the corn’s cell walls. This resultantly gives the flour an almost gluten-like property whilst still remaining totally gluten free. Basically all you need to do is mix the flour with water, knead it for a few minutes and hey presto; you get a workable dough that can be used to make flat breads.
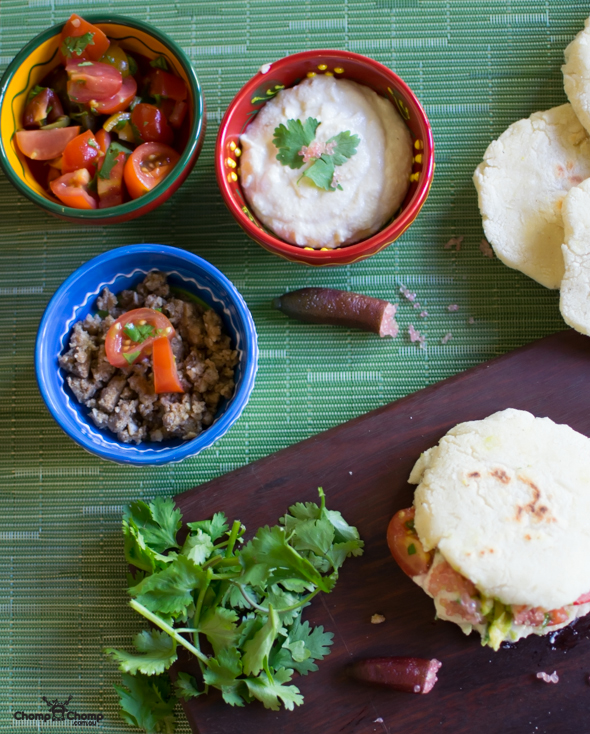
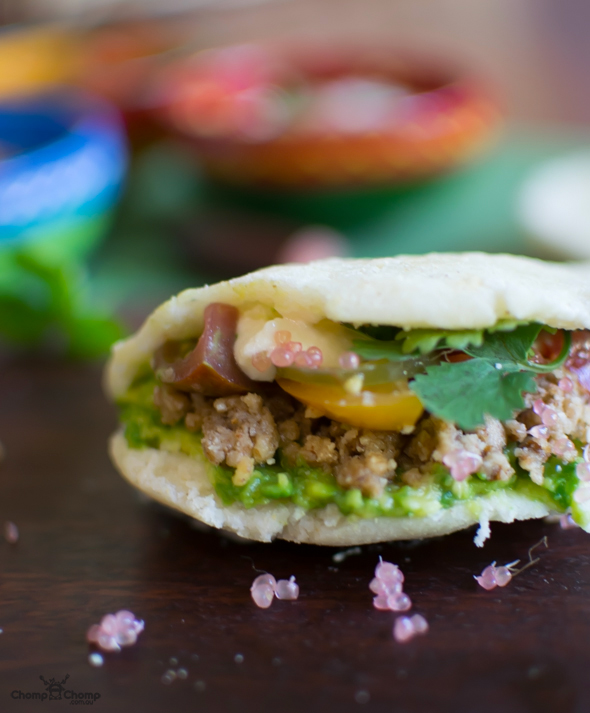
Inspired by its simplicity I tracked down some Masa lista and made some bread for myself. I have been trying to reduce my meat and dairy intake so I made some vegan, fructose friendly tortillas using nut meat, tomato salsa and coconut “sour cream” to stuff the bread with. I garnished it with the very seasonal, beautiful Pemberton Finger Limes.
As all the stuffing for these breads is vegan and raw, if you wanted to turn this into a completely raw dish you could replace the bread with a lettuce leaf or some other large leaved fresh greens.

- 2 cups masa harina or masa lista
- 1 ½ cups of warm water
- 1 cup almonds
- 1 cup walnuts
- 2 tablespoon ground cumin
- 2 tablespoon ground coriander
- 1 tablespoon olive oil
- ¼ teaspoon sea salt
- 2 teaspoon tamari or gluten free soy
- 3 cups cherry tomatoes sliced into quarters, or vine ripened tomatoes diced
- 2 tablespoons coriander
- Jalapeños to taste depending on preference
- 3 teaspoons red wine vinegar
- 3 teaspoons olive oil
- 1-2 ripe avocados, mashed
- 2 cups young coconut meat
- 2 cups pine nuts soaked for at least one hour
- 1 tablespoon of nutritional yeast
- ½ teaspoon salt
- ¼ cup freshly squeezed lime juice
- ½ cup coconut water
- Mix masa and water together in a bowl and work together into a dough. If it appears too dry you can add some more water. Take a piece of the masa dough and roll into a firm ball the size of a gold ball then flatten into a thick disc. Cook on an oiled or non-stick hot grill until lightly browned and then flip and cook the opposite side. Once cooked you can carefully run a butter knife through the centre to split open like a pita bread.
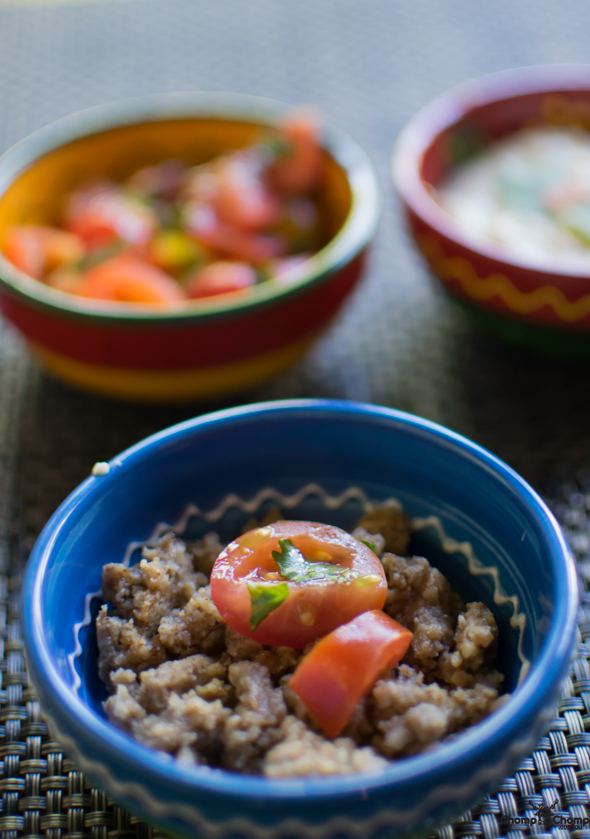
- Process almonds and walnuts into a powder.
- Place nut meal into a mixing bowl, add remaining ingredients and mix well.
- Place all ingredients in a bowl and toss until evenly mixed
- Add all ingredients into your high speed blender and blend until smooth.
- Assemble nut meat, tomato salsa, avocado puree, coconut sour cream into tortillas and top with finger lime pearls.
Thank you to Rebecca Kerr from Australian Gluten Free Cooking for the inspiration for this dish. The recipe for the nut meat is adapted from “Ani’s Raw Food Kitchen” by Ani Phyo, Da Capo Press (2007).

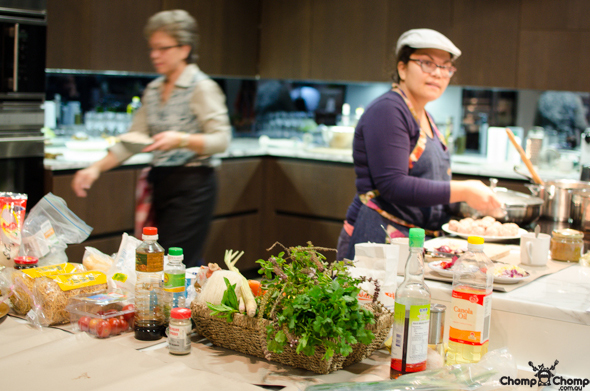
Cambodian and Thai Cooking Classes with Red Hot Spatula at the Accento Home Kitchen, Claremont
Posted by | Categories: Baking, Events, Featured, Perth, Recipes, Thai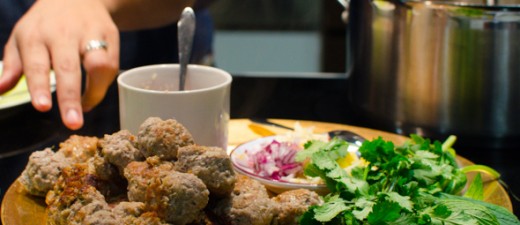
My first experience of Red Hot Spatula’s cooking was at the Clandestine Cake Club last year. Yvonne made these amazing gluten free Asian cakes called Kuihs that were steamed cakes made with rice flour, green bean flour and tapioca flour. I greedily ate a number of them that day before I physically had to stop myself from over eating my welcome. In fact I loved them so much that a few short weeks later I ordered a batch of my own to be delivered to work to share with my colleagues.
Since then Yvonne and I have crossed paths at many foodie events, markets and degustation evenings and I have grown to appreciate her passion and drive for success. Her business has grown from strength to strength and it is so inspiring to see someone reap the rewards from so much hard work.

Spring rolls with Jicama, carrot and Blackwood ear fungus
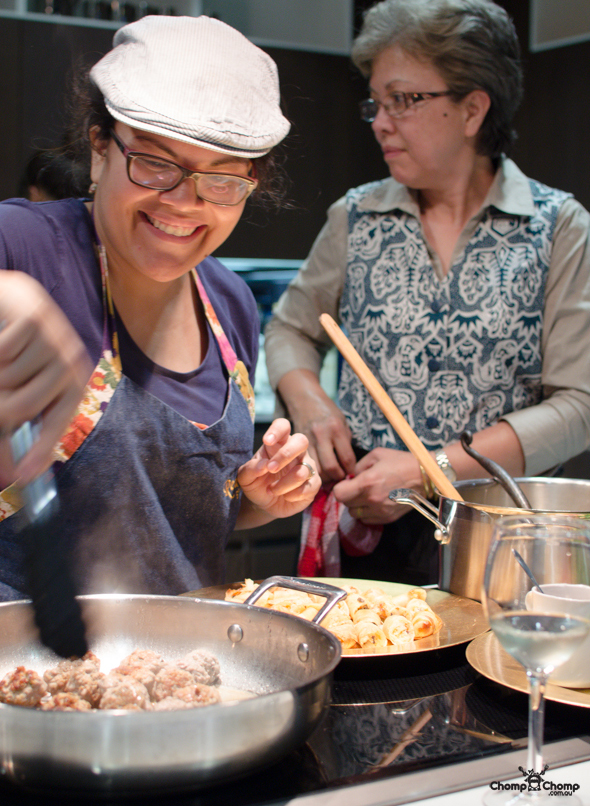
Yvonne cooking Cambodian sausage
She recently conducted a series of cooking classes themed on Asian and Exotic food at the Accento Home Kitchen in Claremont. I chose to attend the evening titled “Cambodia and Thailand – The art of balancing flavours from fresh herbs to chillies”. I invited one of my close friends Tara to join me knowing she would enjoy this style of girl’s night out as much as I would, especially as it included wine!
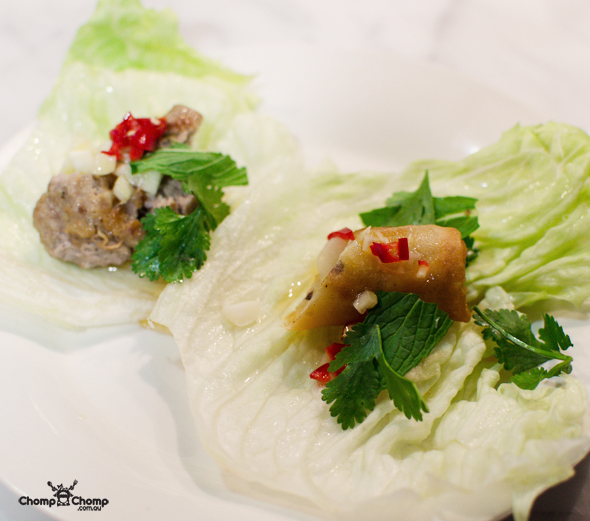
Cambodian sausage & spring rolls
For the duration of the evening we all sat around the exquisite gourmet kitchen in a very relaxed manner laughing, giggling and sharing stories about food. Each course was carefully matched with wines from Swan Valley Wines, a boutique family winery that has produced wines in the valley for over twenty years.

Making the Khao Soi (Spicy noodle soup)
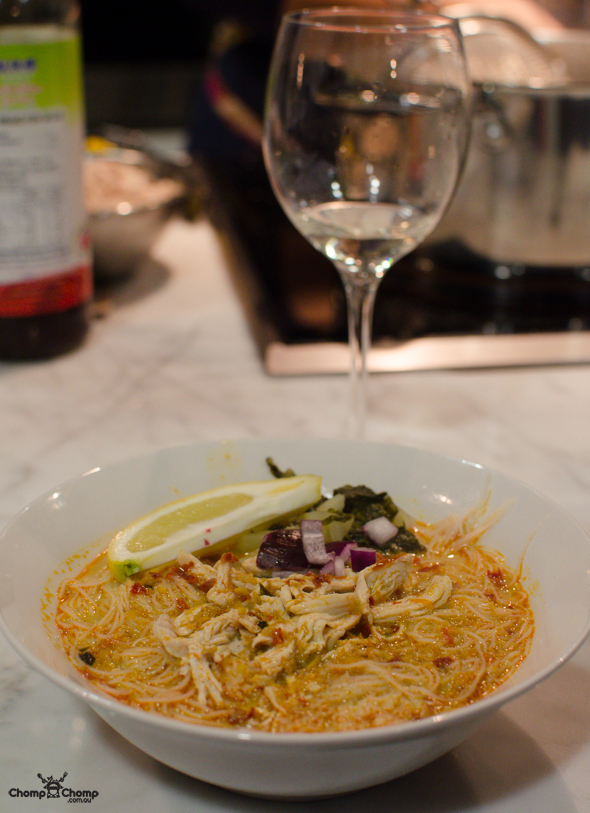
Khao Soi (Spicy noodle soup) made especially gluten free for me
We were all provided with detailed recipes for each dish including tips on where to obtain the freshest and cheapest ingredients around Perth. For someone who has very little spare time in the kitchen, I was impressed with how easy each dish was to prepare and felt confident I could take the recipes and new skills straight home with me and prepare something delicious for the Boy and I to enjoy together.
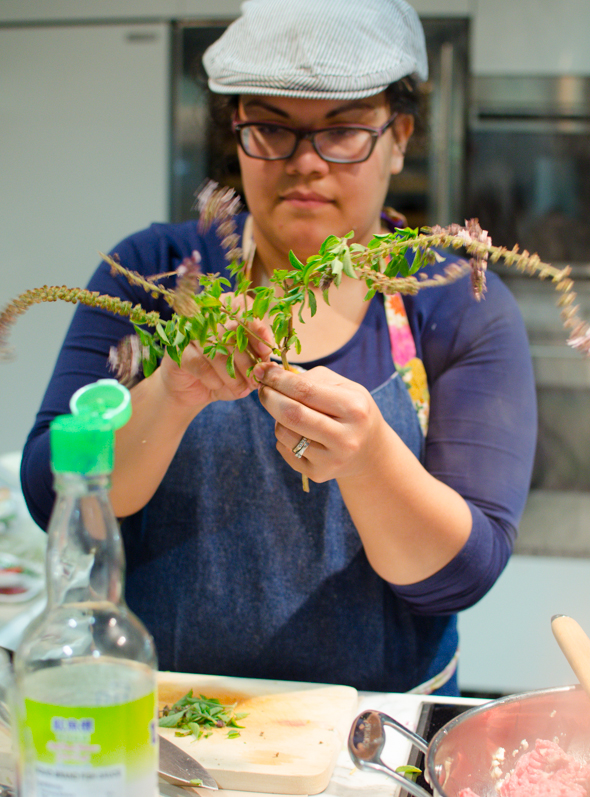
Fresh Holy basil

Beef with holy basil & papaya salad
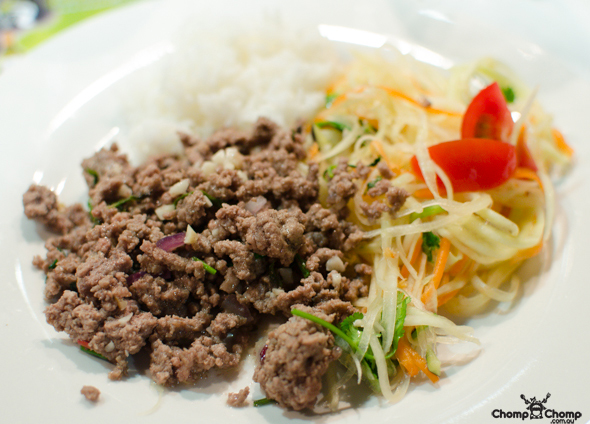
Beef with holy basil & papaya salad
I offer a word of warning about these cooking classes; make sure you arrive with an empty belly! I was glad I had prepared for such a feast and eaten a very light lunch. By the time we got to the dessert we were all pleasantly full. Needless to say that didn’t stop Tara and I reaching for the bowl of sauce for the sweet sticky rice and scraping out the least dregs with our spoons grinning childishly.
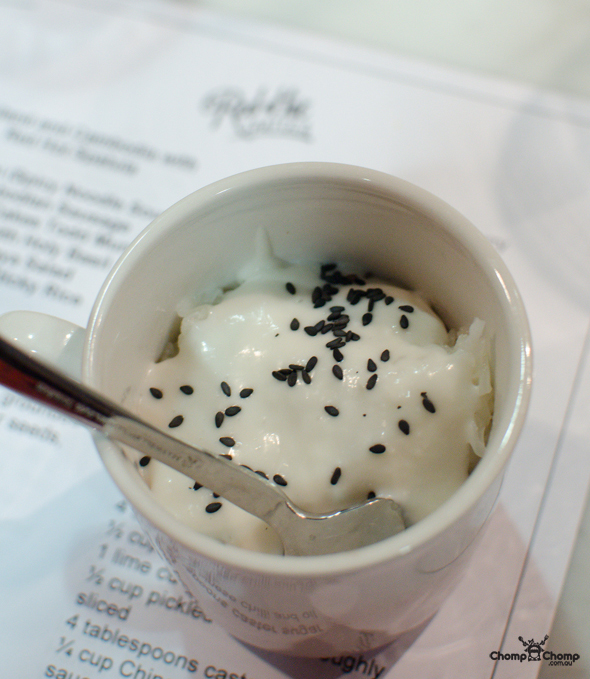
Sweet sticky rice
The next round of Red Hot Spatula’s cooking classes kick off from October 2013 and will be held at their new facilities in Middle Swan. She will be covering a variety of popular topics including gluten free cooking, how to make healthy lunch boxes for fussy eaters, how to use super foods to promote better health and how to pull together the perfect High Tea.
For more information on their upcoming events and contact details head over to Red Hot Spatula’s Facebook page.
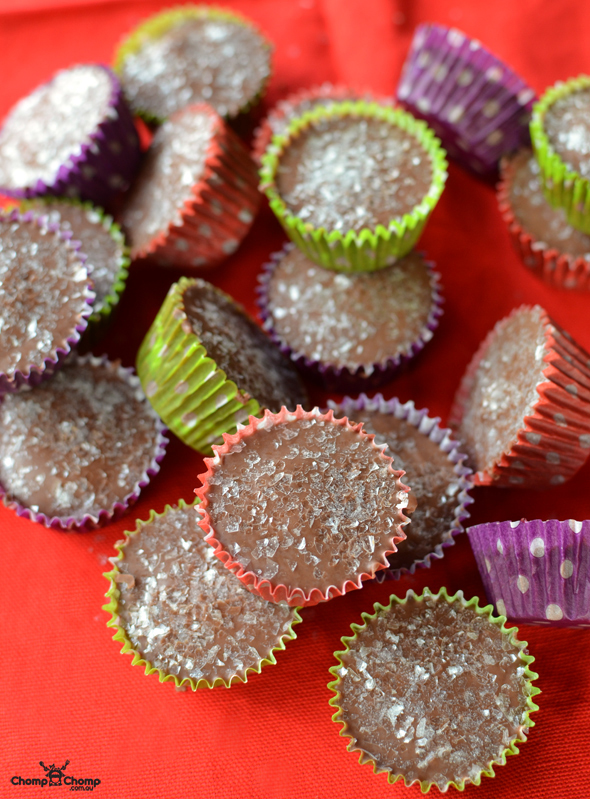
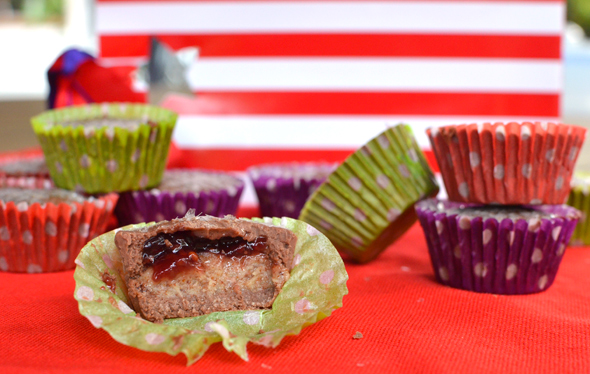
Gluten Free Raspberry and Almond Chocolate Kisses: Sweet Swap 2013
Posted by | Categories: Baking, Desserts, Featured, Recipes, Vegetarian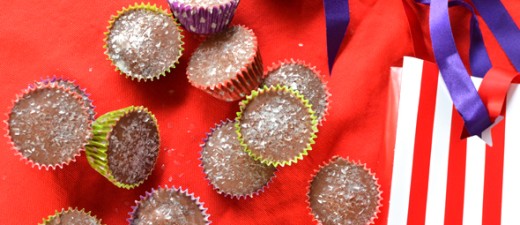
I have a tendency to often bite off more than I can chew. This habit applies not only to my constant overeating but to many other aspects in my life. Working under pressure seems to bring out the best in me however this can sometimes lead to being in the position where there is so much to do that it’s almost overwhelming. Being a persistent and determined person I always seem to get through it all, often with success which only serves to drive me to do it all again. Earlier this year the rambunctious Amanda from Chew Town told me all about her project of The Sweet Swap over an oversized second breakfast at Miss Kitty’s Saloon. It sounded like such a great idea to me. The best way to describe The Sweet Swap is it’s kind of like a food bloggers Kris Cringle but not at Christmas and the presents are all edible.

The basic idea is this: make three batches of some sort of sweet treat that could survive a journey through Australia Post. Send a batch to each of your three nominated bloggers. Wait for your anonymous parcel to arrive from a different blogger. All proceeds go towards The Child Fund charity.

Now I’m not a fancy chef. My recipes have never been the main focus of my blog but more an expression of my interest in food while to meet all my intolerance criteria without sacrificing flavour. So here’s my offering. You won’t be able to stop at just one: Gluten Free Raspberry and Almond Chocolate Kisses.

- 460 g milk or dark chocolate chips
- 2-3 teaspoon coconut oil
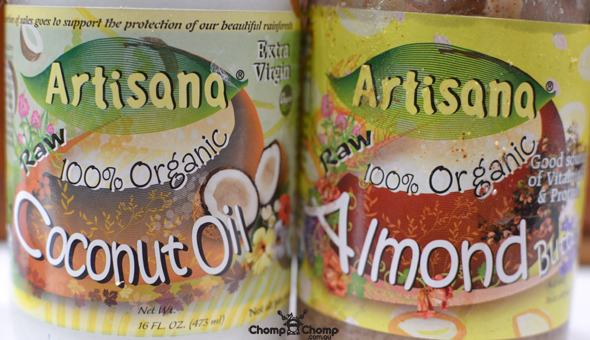
- ½ cup almond butter
- 1 tablespoon powdered/confectioner ‘s sugar
- ¼ cup of raspberry jam
- Line a mini muffin tin with paper liners and set aside.
- Melt the chocolate in a double boiler, saucepan or microwave. Once it’s melted down, add coconut oil to thin out. Add more, if needed.
- Add about 1 teaspoon of melted chocolate to the bottom of each paper cup. Tilt the liners so the chocolate evenly coats the bottom and slightly up the sides. Another option is to take a pastry brush or even a small knife to spread the chocolate.
- Place the cupcake tin in the freezer for 15-20 minutes to let set.
- Meanwhile, mix together almond butter and powdered sugar – this makes it less sticky and easier to handle. Place almond butter mixture in the fridge for 10 minutes.
- Once both timers have gone off, roll [in your hands] about ½ teaspoon of the almond butter mixture and place in the centre of each chocolate cup. Place tin back in the freezer for about 10 minutes.
- Remove and add ¼ teaspoon of jam on top of the peanut butter.
- With the remaining chocolate, cover each cup until covered. Top with sea salt – optional.
- Place muffin tin back into the freezer, last time I promise, for about 20 minutes.
- These can be left out at room temperature or in the fridge.
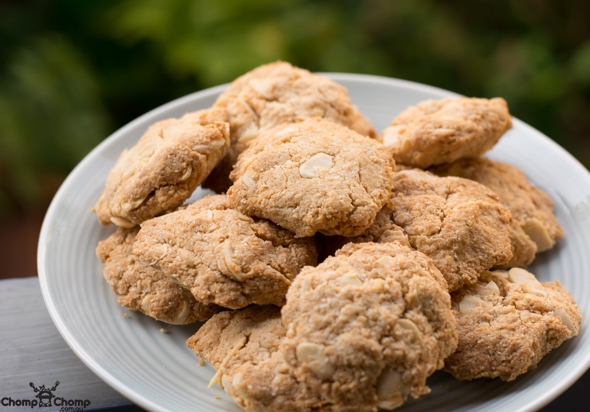
Coconut flour Paleo Anzac Biscuits (gluten free)
Posted by | Categories: Baking, Featured, Paleo, RecipesAnzac Day is the national day of remembrance in Australia and New Zealand where we cast our hearts and minds to those who have fought for our country at war. The day is a national public holiday and across the country there are numerous dawn services that are held attracting both the young and old in the wee hours of the morning. Anzac Day wouldn’t be complete without Anzac biscuits which history claims they were apparently made by soldier’s wives to send to them abroad. After spending the last three months with my days off being filled with wedding planning, it is such a treat to have these days returned to me to indulge in whatever activities I please. It has been a while since I have made any effort in the kitchen so with both the fur children supervising from their cat scratch post I scanned my pantry for some inspiration. With Anzac Day approaching us this week, I have attempted to adapt the classic Anzac biscuit recipe to create Coconut flour Paleo Anzac Biscuits that are dairy free, gluten free and fructose friendly yet still remain delicious!! Is it possible?
- 1 & ¾ cup almond meal
- 1 cup flaked almonds
- 1 cup dessicated coconut
- ⅓ cup coconut flour
- ¼ cup maple syrup
- ½ cup coconut oil, softened
- ½ teaspoon bicarb soda
- 1 tablespoon water
- Preheat over to 130 degrees C.
- Combine the almond meal, flaked almonds, coconut and coconut flour in a large mixing bowl.
- Combine maple syrup and coconut oil in a small saucepan and heat very gently.
- Mix the bicarb and water together then add to the maple syrup mix, stir until mixed.
- Add wet ingredients to dry ingredients and mix thoroughly until combined. Add a small amount of water to help mixture stick together.
- Squeeze firmly into small balls to stick mixture together then flatten slightly and place on a baking try lined with baking paper.
- Bake for about 40 minutes until golden.
- Allow to cool on a rack before serving.
Adapted from the website The Healthy Chef by Theresa Cutter the author of The 80/20 Diet and 101 ways to lose weight.

(photos updated April 2014)
(photos updated April 2014)